RubberToe Electric Brewery - BIAB to 2 Vessel HERMS

Talk about your equipment builds/modifications here
Post Reply
User avatar
RubberToe
Award Winner 13
Award Winner 13
Posts: 3743
Joined: Mon Mar 14, 2011 9:47 am
Name: Rob
Location: Dartmouth
Contact:

RubberToe Electric Brewery - BIAB to 2 Vessel HERMS

Post by RubberToe » Thu May 19, 2011 5:35 pm

Hi all,

I thought I'd start a thread to document the build of my brewery. It will be single tier, single vessel, and electric. I had thought about going two vessel (BK and MLT), full volume mash / no sparge and recirculating but it would either need to be two tier or have two pumps. The cost of one pump is enough and I don't want to have to buy two. If I built it two tier then I'd have to continuously monitor the flow from each vessel to balance the two outputs. When it comes down to it this is very close to BIAB (Brew In A Bag, for those who are unfamiliar with the term).

Therefore I decided to build a BIAB rig. I will only need one pump, one vessel, and it will be single tier. Even though a pump is not necessary for BIAB, I decided to go with one for a number of reasons. It will allow me to recirculate the mash to attain higher efficiency and also give me better control of the temperature since the fluid will be moving.


The Electric:

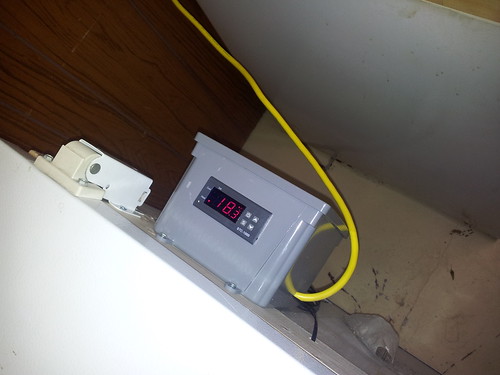
Nothing too fancy. I will be running a 5500W ULWD Camco element controlled by an Auber PID (SYL-2352) and SSR. I have a dryer outlet nearby and use that to power a 240V 30A GFCI spa panel, which will leat to my control box. I will have the pump power and switch in the box too, and maybe the duct fan control. I'll be using an RTD temperature probe with the PID.
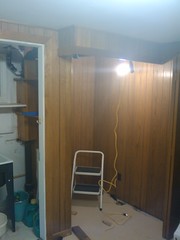

My brewery area:

My brewing area is right next to the laundry with set tub in the basement. It's a nook about 45" wide and 39" deep. I should have plenty of space for everything. I have some 1/8" masonite that I am putting on the walls; on top of that beautiful 1970's wood paneling. I'm going to frame up a low counter so it's easy to access the brew pot, and use some countertop from Happy Harry's.

Image
Future Brewery by Hot Pepper Daddy, on Flickr
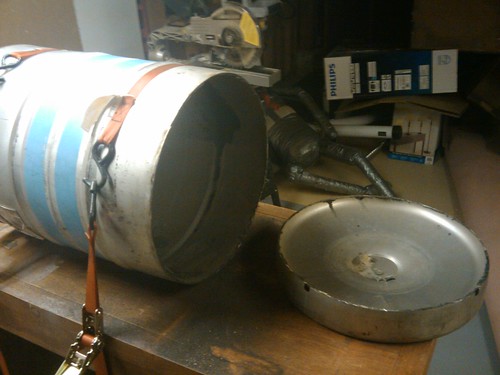
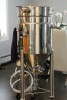

The Vessel:

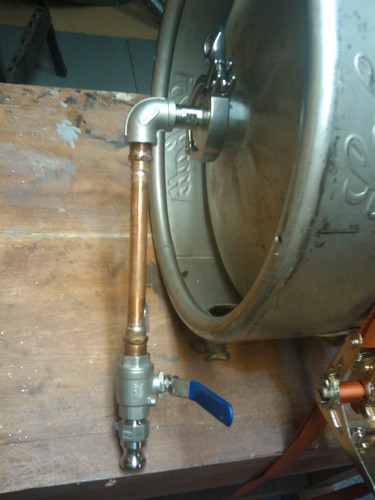
A 15 gallon keg. I'm using it upside down in order to use the sankey fitting as a bottom drain. I have a 2" triclover - 1/2" MPT on the way and that will lead to a stainless 2 piece ball valve, then male camlock. Since the keg will be upside down I'll cut the "bottom" out of it instead of the top. I will turn the piece I cut out into a false bottom by drilling and angle grinding it. If you're interested in that see this thread on HBT: http://www.homebrewtalk.com/f51/cut-keg ... om-192413/. I will solder some threaded SS rod onto the triclover fitting and hold down the false bottom with a wing nut.


The "bag":

For now I'll go with Swiss voile material. I'd prefer a stainless steel insert instead (not just mesh screen) like I outline here: http://www.homebrewtalk.com/f51/biab-ba ... om-243811/. The bag is cheaper and will get me brewing quicker.
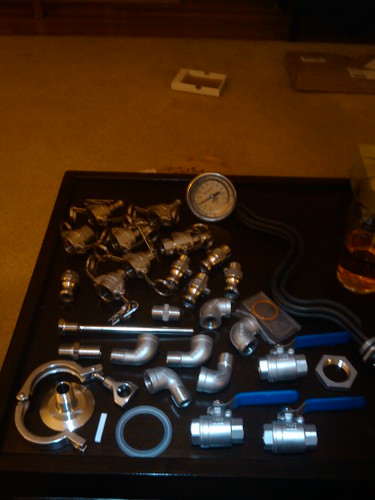
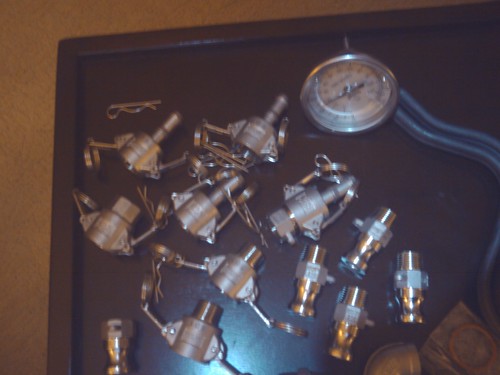
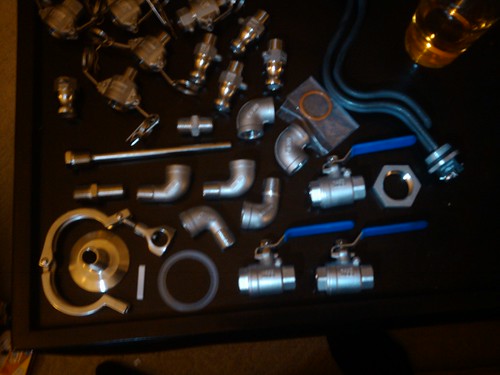

Plumbing:

I am going to plumb a couple extra cold water taps from the laundry area for the water supply and chiller. I'll probably add an inline water filter somewhere down the road. I will have the chiller drain into the set tub. For the plumbing within my system I'll be using 1/2" high temp silicon hose with stainless camlock quick disconnects. The camlocks are en-route from http://www.brewershardware.com/. I'll be going with a March 809 pump but I haven't gotten around to ordering one yet.


Chilling:

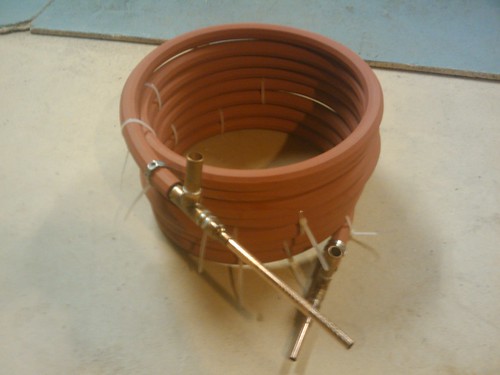
I'm building a 25' CFC. I will clean and sanitize it but I plan on also recirculating boiling wort through it near the end of the boil. For this reason I am going with high temperatre rubber hose. The wort itself doesn't pass through the hose but it will get hot. The copper tubing is 3/8" OD, the hose 5/8" ID. The CFC will be mounted under the table the BK will be on.


Ventilation:

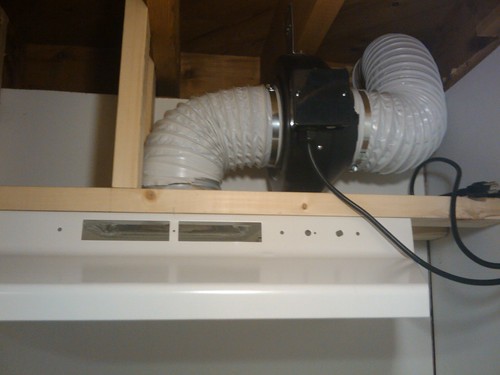
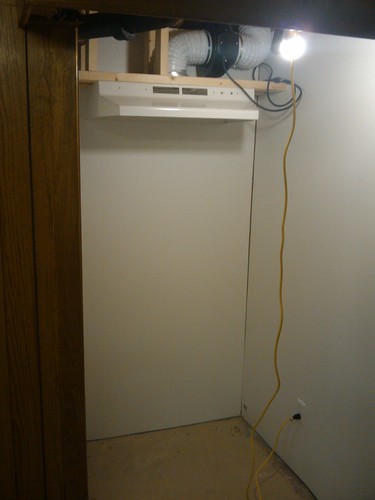
Since this is indoors and in my basement which will get humid enough on its own I'll need good ventilation. I do NOT want to develop mold problems. My brewery is in a nice nook there on the back wall so this will help. I am installing a 30" range hood there but also got a 400 CFM 6" inline duct fan from eBay. I'll be gutting the hood so it's just a hood as to funnel the moisture out better. The duct will exit the house right there.

Image
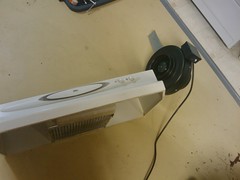
Hood and fan by Hot Pepper Daddy, on Flickr

Image
Ceiling out, ready for duct and fan by Hot Pepper Daddy, on Flickr


I hope I'm not going overboard but a lot of guys go much crazier than this. I figure I'll probably have this brew rig in some form for most of my life so it's worth it.

I'll update this thread as I go. Questions and comments welcome!

:cheers:
-Rob
Electric Brewery Build
On tap at RubberToe's:
Sometimes on a Sunday Belgian Dubbel, Oaked Old Ale, Ordinary Bitter

User avatar
mr x
Mod Award Winner
Mod Award Winner
Posts: 13764
Joined: Fri Sep 24, 2010 5:30 pm
Location: Halifax/New Glasgow

Re: My Single Vessel Electric Brewery Build

Post by mr x » Fri May 20, 2011 5:19 am

Wow, looking good. :cheers2:
At Alexander Keith's we follow the recipes first developed by the great brewmaster to the absolute letter. :wtf:

chalmers
Moderator
Moderator
Posts: 5602
Joined: Thu Sep 23, 2010 4:17 pm
Name: Chris
Location: Halifax / On The Road Again
Contact:

Re: My Single Vessel Electric Brewery Build

Post by chalmers » Fri May 20, 2011 9:31 am

Looking great. Looking forward to the progress.

User avatar
moxie
Verified User
Verified User
Posts: 324
Joined: Sat Nov 06, 2010 1:44 pm
Name: Patrick
Location: Dartmouth

Re: My Single Vessel Electric Brewery Build

Post by moxie » Fri May 20, 2011 1:13 pm

chalmers wrote:Looking great. Looking forward to the progress.
Agreed! I think the single-vessel design is my "ideal" system. Looking forward to see how it progresses.

User avatar
RubberToe
Award Winner 13
Award Winner 13
Posts: 3743
Joined: Mon Mar 14, 2011 9:47 am
Name: Rob
Location: Dartmouth
Contact:

Re: My Single Vessel Electric Brewery Build

Post by RubberToe » Thu Jun 02, 2011 9:08 pm

I got some more hardware in the mail this week. I just took a few quick pics:

Image
Fittings and hardware by Hot Pepper Daddy, on Flickr

Image
Fittings and hardware by Hot Pepper Daddy, on Flickr

Image
Fittings and hardware by Hot Pepper Daddy, on Flickr

I'm not sure if I mentioned this but I'll be using silicon tubing with camlock fittings for my plumbing.

I also have the duct work in, vented outside, and fan mounted. I spent some time working on the range hood last night, I gutted it, put an adaptor on it to connect to the duct, and painted it since I had done some cutting and grinding. I put sheets of white masonite up over those awesome woodgrain panels as well. I'll post more pics of that as it comes along. Also I found a piece of counter top on kijiji for $20 and I'll be cutting it to fit and framing the stand soon.

-Rob
Electric Brewery Build
On tap at RubberToe's:
Sometimes on a Sunday Belgian Dubbel, Oaked Old Ale, Ordinary Bitter

User avatar
John G
Award Winner 2
Award Winner 2
Posts: 651
Joined: Fri Sep 24, 2010 4:34 pm
Name: John
Location: North End Halifax

Re: My Single Vessel Electric Brewery Build

Post by John G » Thu Jun 02, 2011 9:45 pm

Nice SS parts. :drool:
I see you have your electric element in too. Looks like you have some assembling to do.

User avatar
mr x
Mod Award Winner
Mod Award Winner
Posts: 13764
Joined: Fri Sep 24, 2010 5:30 pm
Location: Halifax/New Glasgow

Re: My Single Vessel Electric Brewery Build

Post by mr x » Fri Jun 03, 2011 5:27 am

That's going to be very nice once it finished for sure.
At Alexander Keith's we follow the recipes first developed by the great brewmaster to the absolute letter. :wtf:

User avatar
RubberToe
Award Winner 13
Award Winner 13
Posts: 3743
Joined: Mon Mar 14, 2011 9:47 am
Name: Rob
Location: Dartmouth
Contact:

Re: My Single Vessel Electric Brewery Build

Post by RubberToe » Fri Jun 03, 2011 6:46 am

Thanks, guys. There's another good thing about having a single vessel, you need less hardware so it's easier to afford SS. I always assumed those camlocks were really expensive but they're comparable to the price of regular fittings anyways so I went for it.
Electric Brewery Build
On tap at RubberToe's:
Sometimes on a Sunday Belgian Dubbel, Oaked Old Ale, Ordinary Bitter

User avatar
RubberToe
Award Winner 13
Award Winner 13
Posts: 3743
Joined: Mon Mar 14, 2011 9:47 am
Name: Rob
Location: Dartmouth
Contact:

Re: My Single Vessel Electric Brewery Build

Post by RubberToe » Tue Jun 14, 2011 11:01 pm

I got some more work done on the brewery and snapped a few more photos. I built the header and mounted my range hood, cut the countertop, and cut the top (bottom) off my keg.

Image
Cut Countertop by Hot Pepper Daddy, on Flickr

Image
Cut Keg by Hot Pepper Daddy, on Flickr

Image
Fan and Hood by Hot Pepper Daddy, on Flickr

Image
Brew Space by Hot Pepper Daddy, on Flickr

Image
Brew Space by Hot Pepper Daddy, on Flickr

Or view the whole set.

-Rob
Electric Brewery Build
On tap at RubberToe's:
Sometimes on a Sunday Belgian Dubbel, Oaked Old Ale, Ordinary Bitter

User avatar
mr x
Mod Award Winner
Mod Award Winner
Posts: 13764
Joined: Fri Sep 24, 2010 5:30 pm
Location: Halifax/New Glasgow

Re: My Single Vessel Electric Brewery Build

Post by mr x » Wed Jun 15, 2011 5:22 am

Looking good. Why did you cut the bottom of the keg?
At Alexander Keith's we follow the recipes first developed by the great brewmaster to the absolute letter. :wtf:

User avatar
RubberToe
Award Winner 13
Award Winner 13
Posts: 3743
Joined: Mon Mar 14, 2011 9:47 am
Name: Rob
Location: Dartmouth
Contact:

Re: My Single Vessel Electric Brewery Build

Post by RubberToe » Wed Jun 15, 2011 7:36 am

It's going to be draining from the bottom through the sankey opening. I have a 2" triclover to 1/2" male NPT for that.
Electric Brewery Build
On tap at RubberToe's:
Sometimes on a Sunday Belgian Dubbel, Oaked Old Ale, Ordinary Bitter

User avatar
mr x
Mod Award Winner
Mod Award Winner
Posts: 13764
Joined: Fri Sep 24, 2010 5:30 pm
Location: Halifax/New Glasgow

Re: My Single Vessel Electric Brewery Build

Post by mr x » Wed Jun 15, 2011 10:18 am

Oh yes, very neat. I should have thought of that when I designed my systems. :thumbup:
At Alexander Keith's we follow the recipes first developed by the great brewmaster to the absolute letter. :wtf:

User avatar
RubberToe
Award Winner 13
Award Winner 13
Posts: 3743
Joined: Mon Mar 14, 2011 9:47 am
Name: Rob
Location: Dartmouth
Contact:

Re: My Single Vessel Electric Brewery Build

Post by RubberToe » Sat Jul 09, 2011 8:20 pm

Here's a test fit of the bottom drain. I soldered a pice of copper pipe to some copper 1/2" MPT.

Image
Bottom Drain In Progress by Hot Pepper Daddy, on Flickr

Also today I built (well, mostly built) my CFC. I will also be soldering some copper 1/2" MPT on the wort in/out so I can attach a male camlock to the in side and a temp probe in a T fitting with a ball valve on the wort out.

Image
CFC Almost Complete by [url=http://www.flickr.com/pe
Electric Brewery Build
On tap at RubberToe's:
Sometimes on a Sunday Belgian Dubbel, Oaked Old Ale, Ordinary Bitter

User avatar
mr x
Mod Award Winner
Mod Award Winner
Posts: 13764
Joined: Fri Sep 24, 2010 5:30 pm
Location: Halifax/New Glasgow

Re: My Single Vessel Electric Brewery Build

Post by mr x » Sat Jul 09, 2011 9:11 pm

Looking good!
At Alexander Keith's we follow the recipes first developed by the great brewmaster to the absolute letter. :wtf:

Garak
Registered User
Registered User
Posts: 195
Joined: Tue Feb 08, 2011 10:22 pm
Location: Dartmouth

Re: My Single Vessel Electric Brewery Build

Post by Garak » Fri Aug 19, 2011 10:38 am

I think I'm going to build a CFC this weekend, immersion chiller is just way too slow and coil in a bucket of ice method used way too much ice.

Are the fittings for 5/8"(1/2" nominal) down to 3/8" hard to find or can you get them just about anywhere?

User avatar
RubberToe
Award Winner 13
Award Winner 13
Posts: 3743
Joined: Mon Mar 14, 2011 9:47 am
Name: Rob
Location: Dartmouth
Contact:

Re: My Single Vessel Electric Brewery Build

Post by RubberToe » Fri Aug 19, 2011 11:12 am

I got mine from rona and then tried to find more elsewhere but had trouble so I had to return to rona for those. I got them in bayers lake and not sure if the former pierceys have them but worth a try if they are closer.

For my cfc build I followed the wiki post at HBT. I used crimp connectors instead oh hose clamps.

Sent from my GT-I9100M using Tapatalk
Electric Brewery Build
On tap at RubberToe's:
Sometimes on a Sunday Belgian Dubbel, Oaked Old Ale, Ordinary Bitter

Garak
Registered User
Registered User
Posts: 195
Joined: Tue Feb 08, 2011 10:22 pm
Location: Dartmouth

Re: My Single Vessel Electric Brewery Build

Post by Garak » Fri Aug 26, 2011 1:26 pm

I built my CFC last weekend, I might brew tomorrow and give it a try.

Thanks for the heads up on where to get the parts. It ended up costing about $75 to build.

How is your build going?

I'm thinking I may go a similar route. I'm liking the idea of a single vessel to clean at the end of the brew day. Currently I'm running a make shift 3 tier. Heating all my water in the aluminum boil kettle then using a vacuum pump to move the water up into a Pyrex carboy HLT on top of the fridge. I have a 10 gallon cooler mash tun at counter height. I'm using a 4700watt cartridge heater in the kettle but only getting 3600 watts because the range plug is only 208v here at my apartment.

I find the cooler mash tun is a pain to clean out and wash. I can't just hose it down outside like most guys do as I'm brewing in a 2nd floor apartment. I'm wondering if the bag/basket is going to be any easier to clean?

--
Garak

User avatar
RubberToe
Award Winner 13
Award Winner 13
Posts: 3743
Joined: Mon Mar 14, 2011 9:47 am
Name: Rob
Location: Dartmouth
Contact:

Re: My Single Vessel Electric Brewery Build

Post by RubberToe » Fri Sep 02, 2011 11:15 am

Sorry for the late reply, I missed your post!

I haven't made much progress lately, mostly due to lack of funds. I am 90% done my fermentation chamber (chest freezer, 2 stage controller) though. There are a few things I could just finish up then I could at least start brewing outdoors with propane until my electric setup is complete. My keggerator is currently empty. :(
Electric Brewery Build
On tap at RubberToe's:
Sometimes on a Sunday Belgian Dubbel, Oaked Old Ale, Ordinary Bitter

User avatar
Tony L
Award Winner 10
Award Winner 10
Posts: 1848
Joined: Fri Jul 15, 2011 8:04 pm
Location: Heart's Delight, NL

Re: My Single Vessel Electric Brewery Build

Post by Tony L » Sat Sep 03, 2011 7:31 am

Rasp wrote: Also today I built (well, mostly built) my CFC. I will also be soldering some copper 1/2" MPT on the wort in/out so I can attach a male camlock to the in side and a temp probe in a T fitting with a ball valve on the wort out.
Have you considered making an inline themometer like the one in BYO for your CFC?
http://byo.com/component/resource/artic ... r-projects" onclick="window.open(this.href);return false;

User avatar
RubberToe
Award Winner 13
Award Winner 13
Posts: 3743
Joined: Mon Mar 14, 2011 9:47 am
Name: Rob
Location: Dartmouth
Contact:

Re: My Single Vessel Electric Brewery Build

Post by RubberToe » Sat Sep 03, 2011 8:12 am

Tony L wrote:Have you considered making an inline themometer like the one in BYO for your CFC?
http://byo.com/component/resource/artic ... r-projects" onclick="window.open(this.href);return false;
I haven't seen that particular design before. It's nice and simple (cheaper...).

I have the parts to build one like this:

http://www.hopdawgs.ca/index.php/equipm ... all-valve/

It will be going on the wort out side of the CFC.
Electric Brewery Build
On tap at RubberToe's:
Sometimes on a Sunday Belgian Dubbel, Oaked Old Ale, Ordinary Bitter

User avatar
RubberToe
Award Winner 13
Award Winner 13
Posts: 3743
Joined: Mon Mar 14, 2011 9:47 am
Name: Rob
Location: Dartmouth
Contact:

Re: My Single Vessel Electric Brewery Build

Post by RubberToe » Fri Nov 11, 2011 5:47 pm

I finished my fermentation chamber today. There's enough room for two carboys, a blowoff vessel, and a paint-can-heater. I'm using a two stage controller from ebay. The freezer was free :).

Image
Inside of Fermentation Chamber by Hot Pepper Daddy, on Flickr

Image
Temperature Controller on Fermentation Chamber by Hot Pepper Daddy, on Flickr

Image
Fermentation Chamber by Hot Pepper Daddy, on Flickr

-Rob
Electric Brewery Build
On tap at RubberToe's:
Sometimes on a Sunday Belgian Dubbel, Oaked Old Ale, Ordinary Bitter

User avatar
mr x
Mod Award Winner
Mod Award Winner
Posts: 13764
Joined: Fri Sep 24, 2010 5:30 pm
Location: Halifax/New Glasgow

Re: My Single Vessel Electric Brewery Build

Post by mr x » Fri Nov 11, 2011 11:11 pm

Good stuff.
At Alexander Keith's we follow the recipes first developed by the great brewmaster to the absolute letter. :wtf:

User avatar
John G
Award Winner 2
Award Winner 2
Posts: 651
Joined: Fri Sep 24, 2010 4:34 pm
Name: John
Location: North End Halifax

Re: My Single Vessel Electric Brewery Build

Post by John G » Wed Feb 01, 2012 4:36 pm

Hunting back through your thread - where did you get your stainless fittings from?

User avatar
Jimmy
Site Admin Award Winner
Posts: 6984
Joined: Wed Sep 22, 2010 6:35 pm
Location: Halifax, NS

Re: My Single Vessel Electric Brewery Build

Post by Jimmy » Wed Feb 01, 2012 5:53 pm

John G wrote:Hunting back through your thread - where did you get your stainless fittings from?
I ordered mine from bargainfittings.com, but most of them are available at either fairview fittings, or crane supply in burnside.

User avatar
RubberToe
Award Winner 13
Award Winner 13
Posts: 3743
Joined: Mon Mar 14, 2011 9:47 am
Name: Rob
Location: Dartmouth
Contact:

Re: My Single Vessel Electric Brewery Build

Post by RubberToe » Wed Feb 01, 2012 7:45 pm

John G wrote:Hunting back through your thread - where did you get your stainless fittings from?
I just dug up some of my email receipts. If you have sources for local SS fittings some may be cheaper. I've definitely seen much more expensive prices here though. Here ya go!

From http://brewhardware.com/:

Code: Select all

1" Locknut (NPS)
Item# Locknut	$5.99 USD	1	$5.99 USD
1/2" SS STREET Elbow
Item# 12street	$4.99 USD	4	$19.96 USD
Gaskets
Item# Gaskets , What type?: Silicone Oring for Heating Element Seals (1.25" ID)	$3.00 USD	1	$3.00 USD
Dial Thermometer
Item# 0002 , Select Style: WLT325 - 3" Weldless (with washer, nut and gasket).	$31.99 USD	1	$31.99 USD
1/2" SS Elbow
Item# 12elbow	$3.99 USD	2	$7.98 USD
1/2" 304 SS (full port) Ball Valve
Item# SSBV	$14.99 USD	3	$44.97 USD
Subtotal	$113.89 USD
Shipping and handling	$30.00 USD
Total	$143.89 USD
From http://www.brewershardware.com/:

Code: Select all

CAMC12F12	1/2" Cam and Groove Coupler X 1/2" Female FPT	$6.00  	1	$6.00
CAMP12M12	1/2" Cam and Groove Adapter X 1/2" Male NPT	$4.10  	4	$16.40
CAMC12B12	1/2" Cam and Groove Coupler X 1/2" Hose Barb	$6.25  	4	$25.00
CAMP12F12	1/2" Cam and Groove Adapter X 1/2" Female NPT	$4.00  	2	$8.00
CAMC12M12	1/2" Cam and Groove Coupler X 1/2" Male NPT	$6.00  	2	$12.00
TFB58	1/2" Threaded Hose Barb Full Bore High Flow	$9.75  	1	$9.75
TFN12	1/2" MPT Hex Nipple	$4.00  	1	$4.00
TC20M12	2" Tri Clover X 1/2" Male NPT	$19.00  	1	$19.00
TC20CLAMP	2" Tri Clover Clamp	$7.00  	1	$7.00
TC20SILGASKET	2" Tri Clover Gasket Silicone	$1.60  	1	$1.60
SB3506	PTFE Stir Bar 1 3/8" Square Profile	$4.00  	1	$4.00
TWNS6	6" Non Heat-Shielded 1/2" MNPT Stainless Steel Thermowell	$16.50  	1	$16.50
Subtotal:	$129.25
Shipping cost:	$27.95
From hopdawgs.ca:

Code: Select all

Silicone Tubing (Hi-Temp) 1ft : 10 : 2.99
Stainless Tee 1/2”  : 2 : 4.99
Stainless Hex Nipple  : 1 : 5.49
Weldless Bulkhead 1/2inch  : 1 : 15.99
Weldless Kit for Thermometer  : 2 : 6.99
Stainless 2 Piece Ball Valve 1/2”  : 1 : 18.99
In-Line Sanitary Air Filter  : 1 : 6.99
Diffusion Stone 2.0 Microns  : 1 : 14.99

Subtotal : 116.31
TOTAL    : 116.31
Electric Brewery Build
On tap at RubberToe's:
Sometimes on a Sunday Belgian Dubbel, Oaked Old Ale, Ordinary Bitter

Post Reply

Return to “DIY - Do It Yourself”

Who is online

Users browsing this forum: No registered users and 2 guests